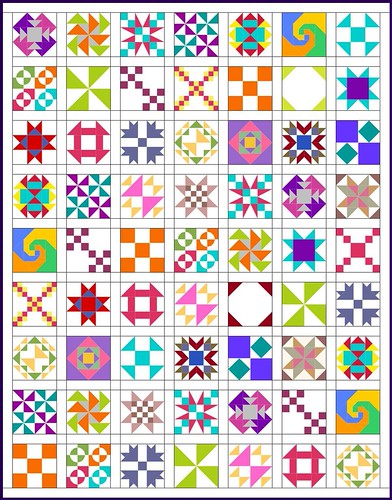
How blocks are laid out greatly affects the appearance of the finished quilt. Some blocks form secondary patterns when they are side by side, creating another layer of visual interest. Some blocks look crowded and busy when laid out side by side so you need to separate them. Sampler quilts especially benefit from some spacing between the blocks. It allows each block to be seen individually and gives a sense of organization that is easier for our brains to process. Look at this example:

Kind of scary, don’t you think? Simply putting some plain sashing between the blocks lets you breathe a little easier:
Alternating the blocks with plain squares eases it even further:

Alternate blocks, either simple or complex, provide a unifying factor to the quilt. A more complex alternate block still looks busy, but because there is a definite pattern, it isn’t as confusing as the original version.


Adding space and uniformity to the overall quilt are good reasons for alternate blocks when you’re talking about a sampler quilt, but alternate blocks can completely change the look of a one-block quilt as well. For example, the classic Shoofly block, when made in a single color, creates an interesting quilt.


Alternated with a Snowball block, however, and you have a completely different – and visually interesting – quilt.


Alternate blocks can be very effective when they pick up elements of the main block. In the Snowshoo example (isn’t that the perfect name!), the triangles at the corners of both blocks are the same size and shape, which helps create a secondary ring pattern.
Here’s another example. The Fifty-Four Forty or Fight block laid out side by side creates an interesting checkerboard pattern.


If you rotate two of the corner four patches in that block and add sashing with cornerstones, you have a completely different quilt.

Now duplicate the four patch element in an alternate block…

…or take that chain concept further and use a Double Irish Chain block with smaller squares in double rows, and it’s yet another look.

There are many blocks that work well as alternates, but the ones I focused on here are the Snowball and variations of the Irish Chain (or Double Irish Chain). They have opposite functions – the Snowball adds space while the Irish Chain ties (chains?) the overall design together. The Snowball is also a great block for featuring a special fabric or quilting motif.


Snowball blocks are extremely flexible – you can use them with any size block. You create them by cutting squares and sewing them diagonally to the corners of the large background square. The size of your squares varies depending on the size and components of your other block. For example:
Paired with a 3-grid block like Shoofly or Nine Patch, you cut the corner squares at 1/3 the finished block size plus 1/2″ seam allowance. See “3-grid” and “1/3″ or 3 and 3? Of course, don’t forget to add the seam allowance. (A 6″ finished Nine Patch block would mean you cut your Snowball corners at 2 1/2″ – 6″ finished divided by 3 = 2 plus 1/2” seam allowance.)

Paired with a 4-grid block like Variable Star, you cut the corner squares at 1/4 the finished block size plus 1/2″ seam allowance. “4-grid” and “1/4″ or 4 and 4. (A 12″ finished Variable Star block would mean you cut your Snowball corners at 3 1/2″ – 12″ finished divided by 4 = 3 plus 1/2” seam allowance.)

Paired with a 5-grid block like Duck and Ducklings, you cut the corner squares at 1/5 the finished block size plus 1/2″ seam allowance. “5-grid” and “1/5″ or 5 and 5. (A 10″ finished Duck and Ducklings block would mean you cut your Snowball corners at 2 1/2″ – 10″ finished divided by 5 = 2 plus 1/2” seam allowance.)

Makes sense, right? This way your Snowball block becomes the same grid as your other block, and your corner components line up.
Snowball Assembly
Start with a large background square the size of the unfinished block you are alternating with. (Okay, I know about not ending sentences with prepositions, but I just couldn’t bring myself to write “with which you are alternating.” Sorry.) In this block, you need two 6 1/2″ background squares.
Cut four 2 1/2″ squares for the corners.

If you like, you can draw a diagonal line on the back of the corner squares – this is your sewing line. If you’d like to make little HSTs from the trimmed corners, draw another diagonal line 1/2″ away from the center line.

Place a corner square right sides together with the background square, lining up the corners and edges. Make sure your drawn lines are “cutting off” the corner and not pointing toward the center.

Sew just toward the seam allowance side of each of those lines.


If you have a seam guide (see the Quarter Inch Seam Skill Builder post for details), you may choose not to draw the lines, and simply line up your corner point with the seam guide (again staying just to the side).

For the second seam, line up the top end of the first stitching line with the 1/2″ guide on your machine and the bottom point with the 1/2″ seam guide marking.

After sewing all four corner squares to the background fabric…

Use a rotary cutter and ruler to trim between the sewn lines (or 1/4″ beyond the line if you didn’t sew the second seam).

Press the corners back and you’re done!

So, any questions about alternate blocks, or about the Snowball block in particular? What are your favorite alternate blocks?

You do an excellent job explaining and showing visuals, enjoy your tips very much. I like the way you show us how to change things up a little and you have so many different looks to the same pattern. Like my patterns. Shift and shuffle and you have a new look. Great Job Sandi
Great post! Out of curiosity – what software are you using to create the quilt images? Is it EQ7? Thanks!
Fascinating post, and great tutorial. It really is amazing, and one of the joys of patchwork, how small adjustments to layout, colour, etc. can create dazzling secondary, and even tertiary patterns. I particularly love the marked difference between the shoo-fly and snow-shoo.
What a great post! The pictures really let me see the differences and more important what I like. Thanks.
i loved this post. i never ever thought of stitching a second line and having a half square triangle done. clever clever clever. i am going to have to steal that idea from you! i loved seeing how each block made such a great quilt and with a little tweaking it became a completely different but equally beautiful quilt! excellent post Sandi! i have to say that the top quilt, the crazy busy one is honestly my very favorite though.
I think I will always be a beginner when it comes to design concept, so I can’t tell you how much I appreciate posts like this. Visual learning is the only thing that seems to work for me and just seeing these different block combinations is a fantastic tool Thanks so much for taking the time to so this Sandi.
Thank you for a great post. I have been given a pile of non-matching disappearing nine patch blocks ffrom my quilt group and been asked to “do something” with them – you’ve given me some different ideas to think about!
What program are you using to make all your layouts? They’re really great!!