The LeMoyne Star block requires eight Y seams, so before you get into it you should review the Y Seam Skill Builder post. Unlike most of the TYSS posts, I duplicated a lot of the Skill Builder instructions in this post.

If you’re following the White & Bright layout, this block is pink and yellow. The block finishes at 12″ (12 1/2″ unfinished).
The first small hurdle in the LeMoyne Star is cutting the diamond shapes. It isn’t difficult once you know how, but it does require the use of TWO rulers, one of which has a 45 degree line. Begin by cutting a 3″ wide strip that is at least 18 inches long from both the pink and yellow fabrics. Place the 45 degree line on your ruler along the bottom edge of the strip and cut to create your first 45 degree angle.
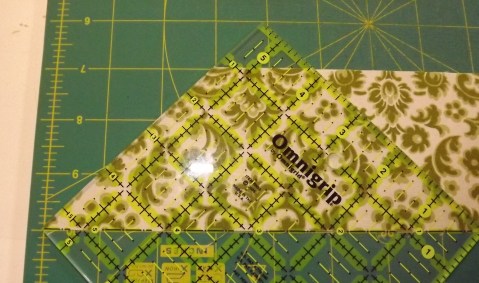
Measure 4 1/4″ from the bottom point with the ruler with the 45 degree line (you don’t use the 45 degree line here, you just need to measure with it so that ruler is available for the next step). Place the second ruler next to it, holding that 4 1/4″ point. Line up the 45 degree line along the bottom edge of the strip with the point of the ruler at the 4 1/4″ point marked by the other ruler. Cut your first diamond. Repeat until you have four diamond of both fabrics.

From your background fabric, cut (1) 6 1/4″ square and (4) 4″ squares. This photo shows the larger square cut diagonally, but before cutting…

…draw a diagonal line 1/4″ from center both sides of center, in both directions.


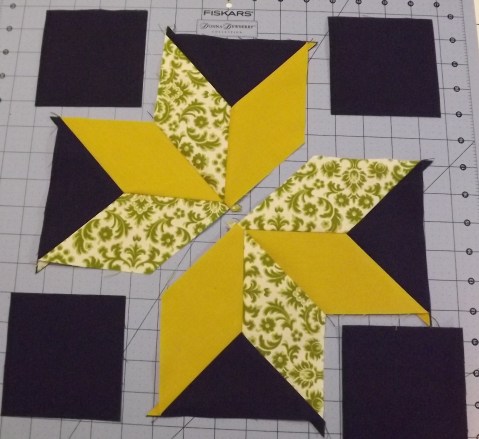
Lay out the pieces, making sure the star points and angles line up perfectly. If the angle of the diamonds are off even slightly, your star may be a bit domed in the middle. Ask me how I know. Honestly, I just went with it instead of ripping it all apart and correcting it. My next attempt will be better.

As mentioned in the Skill Builder post, you may prefer to mark a 1/4″ sewing line along each edge that require a Y seam. That’s what the drawn line are on the background piece above. In my diamonds, I only marked a short 1/4″ line at the tips of the diamonds where the background fabric will be sewn.


Sew the diamonds together in pairs, but only sew as far as the drawn line at the end that will be sewn to a background.

Press to one side, always pressing to the same fabric (either yellow or pink).

Place a background triangle right sides together with one of the pairs. The point should line up with the diamond, and the intersection of the drawn lines should fall at the seam between the diamonds.

Sew on the drawn line, stopping at the point where the lines intersect. You may want to take a backstitch here.
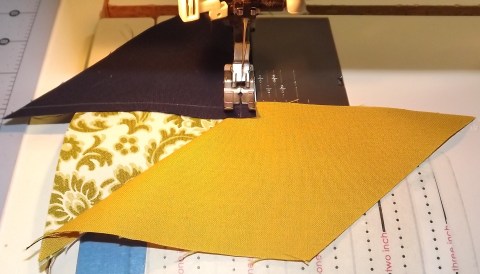
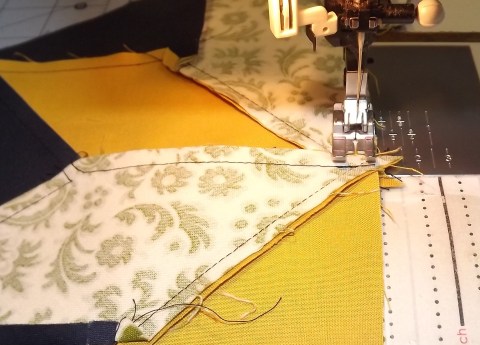
This photo doesn’t show it very well, but there is a seam along the top of the background triangle. In order to create the Y seam, you need to sew the other edge of the triangle (with the drawn line) to the yellow diamond. This takes a little effort.

First, lift the background triangle up out of the way and fold the two diamonds right ides together.

Pull the blue point down and to the right so it lines up with the yellow point. Pinch the blue/green seam and pull it to the left as the blue point comes down.

You can see that the green fabric is folded between the layers.

Sew from point (seam intersection) to point (seam intersection). Drop the needle through the dot or seam intersection, then put the presser foot down. It is important here that you are only going through two layers of fabric, NOT the fabric that is folded out of the way. If you can manually roll the needle down, you can feel more resistance if there is extra fabric. This is one time when an automatic needle up/down button works against you. Sew to the next intersection. I did not mark the outside seam, so just stop 1/4″ from the end.

Y seams can be bulky, so one way to reduce that bulk is to spiral press, “splitting” the seams where they intersect. As long as you did not sew to the edge of the fabric, this is easy. Just press each seam from the intersecting point to the edge. Each one should go in the same direction, as if you pressed in a circle. Once the main seams are pressed, you can press the center, which has a tiny bit of the right sides of each fabric exposed.

Repeat with the other three sets of diamonds, then sew two sets together and repeat with the other two sets.
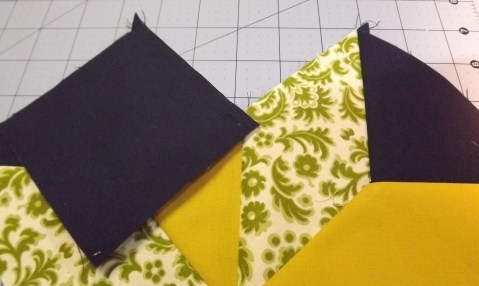
Measure 1/4″ from both edges on a 4″ background square and mark the point with a dot. Place the square right sides together with the star, lining up the top edge with the star fabric edge and the dot with the seam intersection of the diamonds.

Sew from the outside edge to the dot, taking a backstitch at the dot.

Once again, you’ll have to lift the background fabric out of the way and fold the two sides together so you can line up the other edge.

Again, sew from the dot to the edge of the fabric.

Press in a spiral, as you did with the triangle.

Sew the two halves together, crossing just at the tip of the seams where the diamonds come together.
Sew the last two corner squares in the same way you did the last two corners.

Press and square up to 12 1/2″.

There’s your LeMoyne Star… and only two more blocks to go!

I’ve meant to comment on your last few posts, but life’s been crazy busy. Anyway, I LOVE this block!! I don’t know what about it that makes me love it, but I do!! I wanted you to know I’m still following you and have never ceased to be amazed at your creativity and skill. You and the ladies make such beautiful art with your quilting. Thank you for continuing to bring beauty into the world.
Really nice to find your tutorial on the LeMoyne block today as I was searching for the best way to press the seams on my block. Your way works great! Thanks for taking the time to share your technique! Blocked pressed and ready to incorporate!
this went terribly wrong. squares and diamonds too small. diamonds are 10″ long. I cut 4″ strips.