So far the Skill Builder Series has been primarily about construction. It’s time to take a little break from that and work on the head stuff instead of the hand stuff. Be sure to check out Jeanne’s post as well – we’re each going to do two posts on drafting, the first focusing on existing blocks and quilts, and the second on creating your own designs.
In this post I’m going to explain how to break down a traditional block, figure out its components, and determine how to construct it without benefit of a pattern. Before I go too far, I want to talk a bit about copyright infringement. I am not a lawyer and the information I’m sharing is simply my understanding, not a legal opinion. (Yeah, that’s the CYA statement.) There are a few things to know about copyright when it comes to quilt patterns.
Copyright
1. You cannot copyright a technique. (“Technique: A systematic procedure, formula, or routine by which a task is accomplished.” – BusinessDictionary.com) For example, drawing diagonal lines on the back of a square and sewing it to another square, then cutting down the center to create two half square triangle units is a technique. Even if I were the first person to do this, I couldn’t copyright it and insist that I receive payment if anyone else uses that process.
2. There are many, many traditional blocks that are now in the public domain, which means their copyright has expired. If a block was published before 1923 it is in the public domain and can be used freely. There are other specific rules, but 1923 is a good date to remember. Check Barbara Brackman’s book, “Encyclopedia of Pieced Quilt Patterns” or its companion software, Blockbase (through Electric Quilt), or “The Quilter’s Album of Patchwork Patterns” by Jinny Beyer for more information about original publication dates for specific blocks.
3. While you cannot copyright a block that is in the public domain, you CAN copyright instructions that you’ve written on how to make the block (or a quilt or other project). The text and diagrams belong to the person who created them.
4. It’s okay to make copies of something for your own personal use. It is NOT okay to make copies to share with friends.
5. Even if a book is out of print, someone else holds the copyright. Even if a pattern is given away for free, someone else holds the copyright. Sometimes the author will indicate on the pattern or on their blog that it can be used for certain things, but if they don’t, ASK. It’s not unusual for them to grant permission, but you have to ask. And if they say no, then don’t.
6. Copyright isn’t just about the pattern, it’s also about money made from the pattern, either by redistributing it or selling a quilt made from an original design. Re-selling the original pattern is fine; copying it and selling it (either the original or the copy) is not. Likewise, purchasing a pattern for an original design (a copyrighted block, for example) allows you to make the quilt, but not to sell quilts that you’ve made from the pattern.
7. A copyright does not have to be registered to make it legal. If a person writes something on their blog, it’s theirs whether they specifically tell readers it’s copyrighted or not. That’s true for text, patterns, diagrams, photos, or anything else that is created. It’s a good idea to remind people by including a brief statement or the copyright symbol with your name and the date.
If you’d like to read more about copyright as it relates to quilting, check out some of these sites:
Copyright & Quilters (This one is particularly good.)
Lost Quilts Come Home – Copyright Infringement
Electric Quilt’s Copyright Info Page (If you use EQ products – if not, it isn’t relevant.)
Bottom line: Be respectful of other people’s work, don’t copy and share their written patterns, but don’t worry about recreating a quilt that is made of traditional blocks that are in the public domain, even if someone has written a pattern for it. They only have rights to their text, diagrams, photos, etc., not to the design. (Of course this is assuming the quilt is in a common setting – if they did something original with the layout or other design, that may be protected.)
Whew! Moving on…
Grids
Many – but certainly not all – pieced blocks are created on a grid, which is why graph paper is so useful. The first step to deconstructing a block is identifying the grid size. The most common grids sizes are 2, 3, 4 and 5. Here are some examples:
2 Grid


3 Grid


4 Grid


5 Grid


In each example, you should be able to divide the block evenly, both across and down, by the size of the grid. This is important for determining the size of blocks. A block that is on a 3 grid is easy to construct when it finishes at a size divisible by 3 – for example, 3″, 6″, 9″, 12″, 15″, and so on. Likewise, a 4 grid works well at 4″, 8″, 12″, 16″, etc. and a 5 grid is best at 5″, 15″, or 20″. A 2 Grid is the easiest – obviously 2″, 4″, 6″, etc.
Here’s why: Say you have a 4 grid block made entirely of squares (a Sixteen Patch).

If you make a 4″ finished block, each square will finish at 1″. If you make an 8″ finished block, each square will finish at 2″. A 12″ block has 3″ squares, and so on. Now imagine making this block so it finishes at 9″. Each square would finish at 2 1/4″ (9″ divided by 4 = 2 1/4″). Possible, but not as easy to calculate as the others. A 4 grid block is fairly easy because it breaks down into quarters. Imagine making a Nine Patch block (3 grid) that finishes at 5″. Each square would have to finish at 1 2/3″ – not an easy measurement in quilting.
You probably noticed that several examples can break down even further. Rather than call it a 6 Grid or a 15 Grid, I like to think of blocks in terms of 2, 3, 4 or 5, and then break down each half, third, quarter, or fifth into another grid.
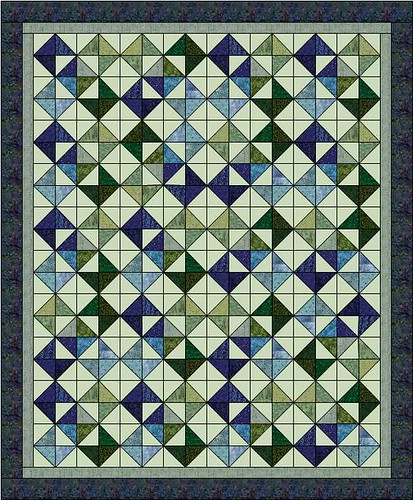
Look at the second block in the 5 Grid example. The block is called Goose in the Pond, by the way.

The first step is to divide it into the basic grid, five across and five down. That tells you the finished block should be divisible by five. But wait – some of the squares are divided further into a 3 grid. See the nine patch and the rail fence components? To make construction as easy as possible, you might want to make the block in a size that is divisible by both 5 AND 3. A 15″ block would work, as would a 30″ block. Half inch measurements aren’t difficult, so you could also try a 22 1/2″ finished block. Here’s how the pieces would break down:
15″ block – squares in nine patch would finish at 1″, HSTs would finish at 3″
22 1/2″ block (15 x 1.5) – squares in nine patch would finish at 1 1/2″, HSTs would finish at 4 1/2″
30″ block – squares in nine patch would finish at 2″, HSTs would finish at 6″
You could even turn this into a lap quilt made of one big block that is 60″ square.
Components
Once you’ve determined the grid, you need to figure out what components make up the block. Sometimes it’s obvious, as in the Goose in the Pond. Some HSTs, a few Nine Patches, some Rail Fences and plain squares – easy peasy. Sometimes the fabric or color placement means you need to look a little closer. Take this block, called the Capital T:

At first glance, the aqua fabric at the center stands out, and then you see the T shapes at each corner. If you ignore the fabric and just look at the lines, it becomes more obvious:

See the components? How about now?

When you look at it without the colors interfering, you can see the block is comprised of HSTs, Flying Geese and a plain square – all very basic components.
Assembly
Let’s continue with the Capital T block. It’s a 3 Grid, so it’s best to create the block in a finished size that is divisible by 3. For the sake of continuity, let’s make a 12″ finished block. If the block finishes at 12″, then each square of the grid would finish at 4″ (12″ divided by 3 across or down equals 4″). There are nine squares in the grid:
1 square
4 HSTs
4 Flying Geese sets
We’ll start with the square, since it’s so easy. The square finishes at 4″, but you need to add 1/4″ seam allowance on each side, so you’ll cut the square at 4 1/2″. Remember, a finished block is always 1/2″ smaller than the unfinished (not sewn into a quilt) block, a finished component is always 1/2″ smaller than a component that has not been sewn into a block, and a finished square is always 1/2″ smaller than a cut square.
Next, you’ll need four HSTs. They also finish at 4″, so refer back to the HST Skill Builder posts (mine and Jeanne’s) and follow the instructions for your favorite method of constructing half square triangles that finish at 4″.
Finally, you have four Flying Geese sets. Notice I said “sets” – there are actually eight Flying Geese. You know they finish at 4″ wide, because that’s what the grid has determined. Two Flying Geese are 4″ high, so each Flying Geese unit finishes at 4″ x 2″. Refer to the Flying Geese posts (again, mine and Jeanne’s) and follow the instructions for your favorite method of constructing Flying Geese that finish at 4″ x 2″.
(I deliberately did not write out the details of how to construct these components – the skill you’re building in this post is the ability to break down a block and create it from components that you already know how to make.)
Once you’ve made all of your components, lay out the block. The Flying Geese units are still separate – go ahead and sew those together so you have four Flying Geese Sets. You now have nine component squares, exactly as a basic 3 Grid would have. Sew those units together just as you would a Nine Patch block, and you’re finished!
Identifying Blocks in a Quilt
When you see a block on its own, identifying the components within it is fairly easy. But when a block is used in a quilt without anything to separate it from the next block, it can be more challenging. Secondary patterns are wonderful, but they can blur the block. Also think about whether the quilt is a straight setting or on point. Sometimes just tilting your head sideways will make the block more obvious. Here are some examples:

Monkey Wrench or Snails Trail block:

Mosaic #10 block – a little easier to see in this colorway:

And here’s the block:

Recognize this one?

It’s the Friendly Hand block from above:
And finally:

The good ol’ Goose in the Pond, on point, using batiks:

For me, being able to break down quilts and blocks and recreate them opens up a whole world of possibilities. In fact, I almost never follow instructions when I make a quilt. I still purchase books and patterns sometimes, but I do it for the pictures, not the patterns. There are so many different techniques for creating the components, and too often the pattern instructions are for a method that I don’t like. Many patterns still use the traditional method of cutting squares the perfect size, cutting them diagonally, then piecing them together to make a HST. That just doesn’t work for me. By using the two squares method, or Triangle Papers, or strips, and usually making them larger then trimming to size, I create the same effect but in a way that is logical for me.
So does the deconstruction and reconstruction of blocks and quilts make sense to you? Do you have any questions or suggestions?

Wow, that was a very long but interesting and informative post. Thanks for sharing it.
Lots of food for thought here for newbies and experienced quilters both.
Here is a good resource on copyright: http://www.teachingcopyright.org/
This is amazing information. I love the idea of studying quilts and breaking down how they are made. That is EXACTLY how I sew (though to this point I sew only clothes and bags). Thanks for sharing!